Get in touch with Suzhou Simitch Machinery Co., Ltd Company

How to Remove Rivets: Match the Method to the Fastener

How to Remove Rivets: The Basic Method
For standard blind and solid metal rivets, knowing how to remove rivets takes 2 steps at low drill speed. First, knock out any blind mandrel pin and drill only the head depth using a nominal hole bit for blind rivets or a slightly smaller bit for solid rivets. Second, hold the hole and punch the shank out.
Semi-tubular and removable-plastic rivets require different release methods. Clamp the workpiece firmly before you begin. The repairs of aircraft skins, structural frames, and vehicle safety joints require OEM repair manuals first. On heavy structural steel frames, crews grind or shear the head under structural specifications such as Iowa DOT SP-236023, back the member around the hole before punching the shank, and apply airborne lead dust and fume controls under 29 CFR 1926.62 (d) (2) (iii) (B) when disturbing legacy coated steel.
Most cases of sheet metal damage happen when an operator treats a rivet like a broken bolt. Drilling straight through the joint gouges the bore wall. According to the MIT D-Lab Fasteners learning guide, pop rivets form a semi-permanent joint and must be destroyed during removal. Destroying the fastener head never requires cutting the surrounding parent metal.
The 3-Zone Rivet Removal Map for Fastener Rework
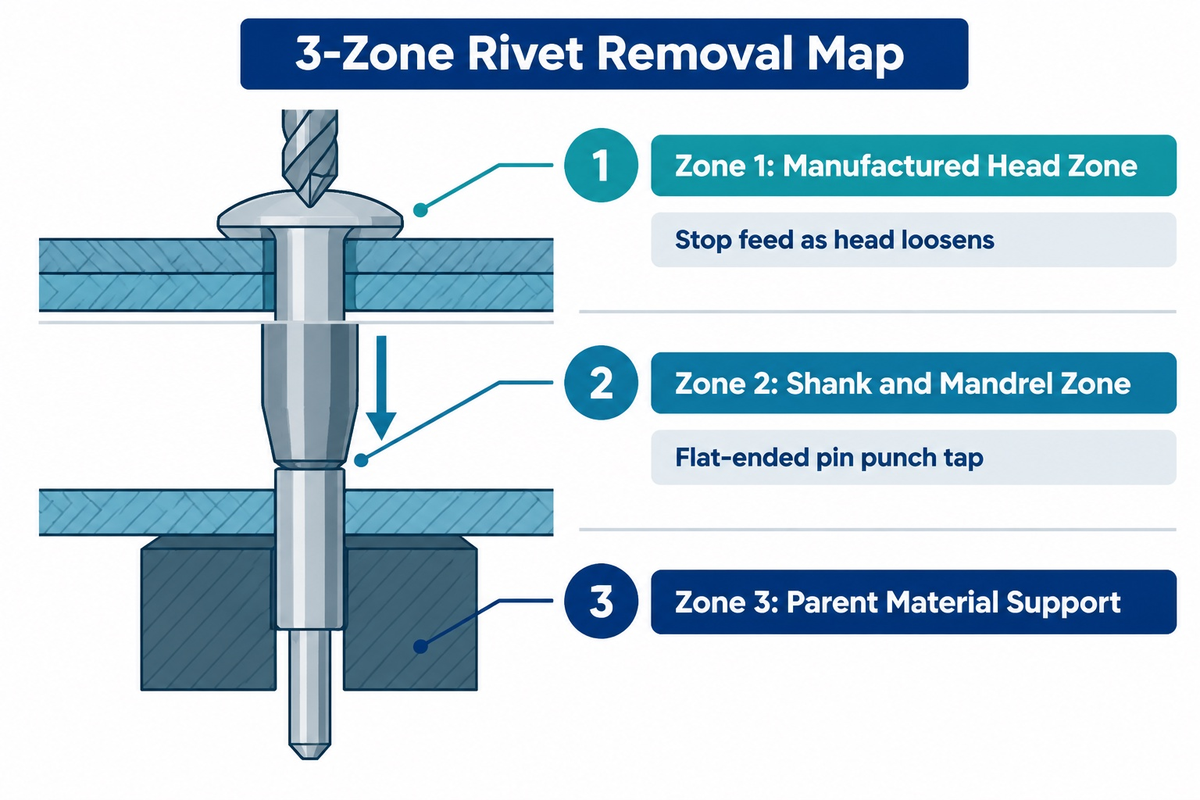
Our 3-Zone Rivet Removal Map divides every metal rivet head-and-shank removal job into 3 distinct physical zones to position the cutting tool to stop before it reaches the joint hole. Each zone has its own tool action and stopping rule.
- Zone 1 (Manufactured Head Zone): Cut, drill, or grind only to the base of the flange where the head meets the top sheet surface. Stop the drill feed as soon as the head starts to loosen or spin on the bit tip, and pry the separated cap free.
- Zone 2 (Shank and Mandrel Zone): never chase the cylindrical shank down the bore with a spinning drill bit; use a flat-ended pin punch and a gentle hammer tap to push the freed shank out of the hole.
- Zone 3 (Parent Material Support Zone): Place a steel backing block, bucking bar, or socket ring around the hole so the shank has exit clearance. Disconnect power and check behind the panel for wiring and fluid lines before driving the mandrel inward.
According to FAA Advisory Circular AC 43.13-1B Change 1, the practices related to general sheet-metal inspection and repair apply only to the non-pressurized areas of civil aircraft. These practices only apply if no manufacturer repair instructions exist.
Following this three-zone boundary ensures the cutting edge stays away from the bore wall. Now check which fastener family is in your panel to decide on a tool.
Identify Blind, Solid and Plastic Rivets Before You Start
Blind pop rivets, solid rivets, semi-tubular rivets, and plastic push fasteners lock into a joint through 4 different tail mechanisms. Inspecting the head and tail before you use a drill prevents widened holes and cracked panels. Check both the front cap and the back tail mechanism whenever the rear surface is open.
Familiarity with how a riveted joint is formed on industrial riveting assembly systems speeds visual identification on the shop floor. A blind pop rivet consists of a hollow cylindrical sleeve with a center mandrel stem that upsets the blind tail from one side. A solid rivet consists of a manufactured smooth head on one side and a solid bucked shop head on the other. This profile is shown in the Experimental Aircraft Association (EAA) sheet-metal repair guide. A semi-tubular rivet is solid on the cap side and has a shallow rolled cavity on the tail side.
Plastic panels add another distinction for maintenance crews. First check whether a metal blind rivet clamps a plastic bracket or whether the fastener itself is a molded plastic push pin. According to Essentra Components technical guidance on removable rivets, removable plastic fasteners include acetal or nylon 6/6 crosshead screw rivets, nylon 6 knobhead push-in rivets, nylon pin-and-grommet rivets, and polycarbonate pop rivets. Essentra Components describes its knobhead push-in rivets as reusable up to 25 times without drilling.
| Row | Rivet Type and Material Category | Access and Joint Condition | Primary Removal Method | Hole Protection Focus and When to Reroute |
|---|---|---|---|---|
| 1 | Standard blind (pop) rivet in aluminum or mild steel | Both sides accessible; non-structural sheet metal | Knock mandrel pin out if needed, center-drill head at low speed with nominal hole bit, pry cap free, and punch shank out | Support thin sheet metal around the hole; verify mandrel position by model first |
| 2 | Standard blind (pop) rivet in closed box or tube | Front flange accessible only; blind backside cavity | Drill head with depth stop collar and capture flange ring on the drill bit | Pause if a loose tail drop could short live electrical hardware inside a tube |
| 3 | Spinning blind (pop) rivet in thin sheet metal | Flange rotates in bore when drill bit engages | Mask surface, pinch backside tail with needle nose pliers or wedge a flat blade under the flange, and drill with a cobalt bit | Stop feed pressure on a spinning sleeve; back the hole with a socket ring and push shank out with a pin punch |
| 4 | Solid aluminum or mild steel rivet (AN470 universal head) | Both sides accessible; general fabrication | Center-punch head, drill to manufactured head depth with a slightly smaller bit, and snap cap off | Keep bit centered within head depth; support around the hole with a backing tool before punching shank |
| 5 | Heavy solid steel rivet in thick plate or frame | Limited rear clearance or high shank interference | Follow OEM frame manual or structural spec (such as Iowa DOT SP-236023 on bridge steel) using a hand grinder or rivet buster, then punch supported shank | Do not hammer unsupported vehicle frames; keep bridge steel burr chamfers within 1/32-inch (0.8 mm) and apply 29 CFR 1926.62 lead dust/fume controls on coated steel |
| 6 | Semi-tubular or oval-head tubular metal rivet | Both sides accessible on hinges, brakes, or linkages | Drill or grind either the factory head or the thin rolled clinch lip on the tail side, then push the shank out | Protect pivoting washers from heat; stop cutting as soon as the lip or head separates |
| 7 | Release-type plastic push-in rivet (nylon 6 or nylon 6/6) | Center pin or knob head accessible from front panel | Push-to-release designs unlock when the center pin moves inward. Pull-to-release designs unlock when the pin is lifted | Check pin release direction first. Forcing the pin in the wrong direction can damage the legs |
| 8 | Screw-type plastic rivet or metal pop rivet clamping plastic | Fragile polymer trim or fiberglass panel joint | Unscrew crosshead nylon pin with a screwdriver, or back plastic tightly while drilling | Replace brittle plastic fasteners instead of forcing reuse; keep drill heat low |
| 9 | Structural blind rivet, self-piercing rivet (SPR), or safety joint | Pressurized aircraft skin, bridge girder, or crash structure | Follow OEM service bulletin or structural engineering repair manual for extraction | Stop general DIY removal; hole reaming limits require formal engineering sign-off |
Once you’ve matched your fastener to one of the 9 rows above, check if it’s a standard blind pop rivet. Blind rivets are the easiest metal fasteners to clear when you control drill depth.
Drill Out a Blind Rivet Without Enlarging the Hole
Centering the drill bit in the sleeve bore, then stopping the feed pressure once the flange ring separates is how you’d drill out a blind rivet without enlarging the hole. Before starting, clamp the panel against a rigid backing block, and use a low speed on the drill. Remove the remaining body with a pin punch.
This is the controlled sequence for the fastener check in the previous section. Before you try to drill the flange, inspect the center of the pop rivet head. In its technical guide on removing blind rivets without damage, GESIPA USA mentions that the proud or flush mandrel pin must be tapped inwards with a pin punch first. Removing the hard center pin prevents the drill tip from skating off center.
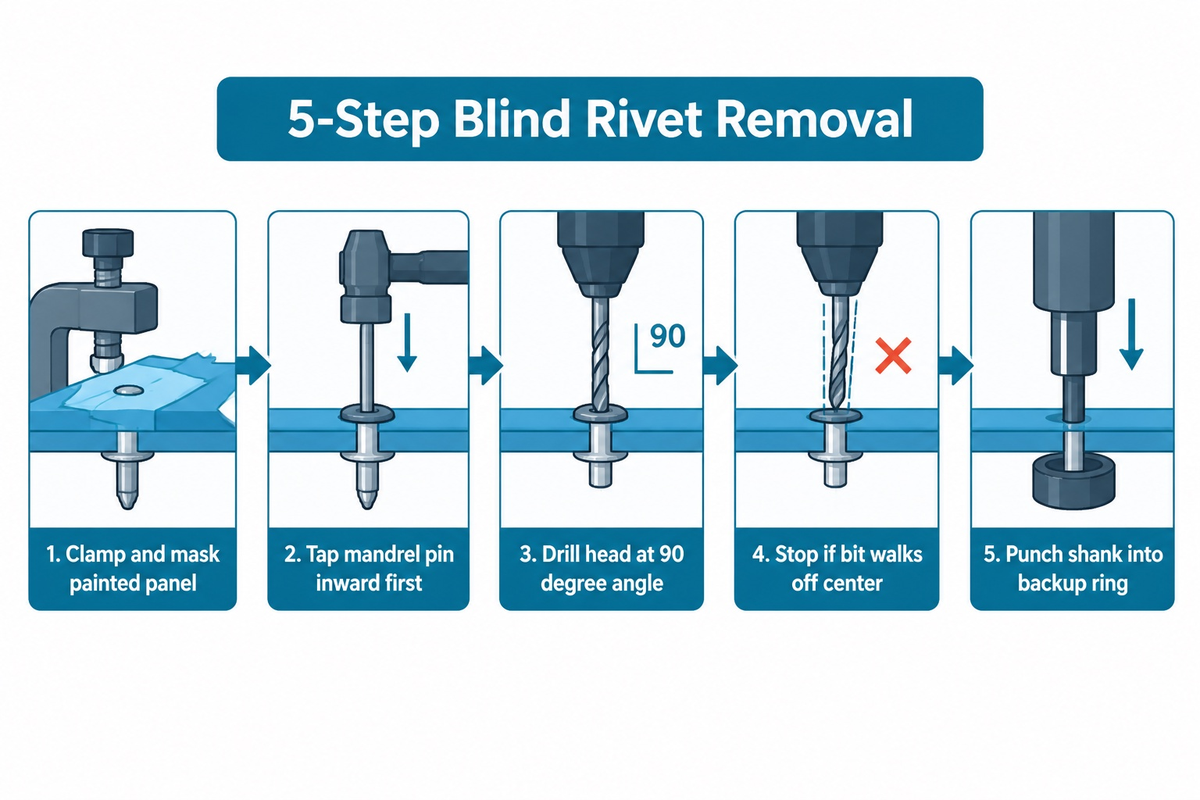
Follow these 5 steps to remove the rivet cleanly:
- Support and mask the panel by clamping the workpiece so it can’t flex under axial load. For painted aluminum or finished bodywork, masking tape should be applied to the rivet head.
- Seat the center point by touching the drill bit tip to the center recess of the blind head. If the mandrel pin is proud or flush, tap it down with a small punch first.
- Drill the head at a 90 degree angle to the panel surface. As The Honest Carpenter notes on pop rivet removal, ease off pressure as soon as the head starts to separate and climb the bit flutes.
- Stop the drill if the bit walks or cuts the parent metal. According to ACS Composite’s automotive rivet guide, drilling at an angle or picking the wrong bit diameter prevents clean head separation.
- Punch the shank into a safe catch zone by placing a backup socket or ring to the rear of the shank. Use a punch and a light hammer tap to push the headless cylinder out of the rivet hole.
Many shop video clips on YouTube show operators shoving a spinning drill bit through the joint in one pass. That shortcut flutes the hole into an oval shape as the thin material flexes. Using the correct drill bit makes clean shoulder cutting pretty easy without touching the hole wall.
Choose the Drill Bit for the Rivet and Material
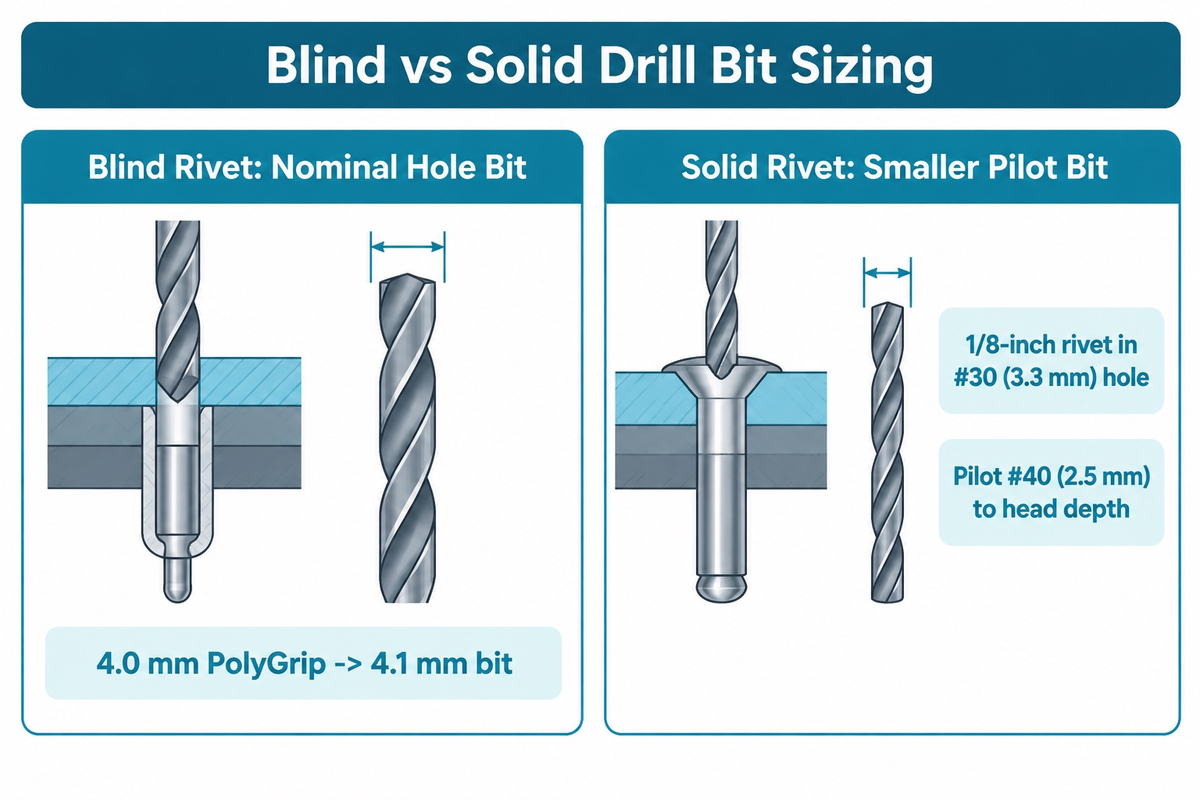
Blind rivet sleeves and solid rivet heads use 2 different drill bit sizing rules. Blind rivet manufacturers specify a drill bit matched to the nominal sleeve hole diameter, such as a 4.1 mm bit for a 4.0 mm blind rivet. A solid rivet, on the other hand, uses a bit smaller than the originally installed hole drill.
On a solid rivet, an oversized or off-center drill bit can cut into the surrounding plate if it advances beyond the manufactured head. Why do shop guides disagree on whether the drill bit should be the same diameter, slightly smaller, or slightly larger? This is all because of mixed fastener geometries. With a blind rivet, an open channel can help locate the drill point, but it doesn’t assist in positioning the cutting edges. A solid rivet has no center channel, so a larger bit would take an edge if your hand isn’t placed properly.
What is the best drill bit for drilling out rivets?
The best drill bit for drilling out rivets is a sharp split-point cobalt or titanium-coated high-speed steel (HSS) bit sized to the fastener structure. Use rigid cobalt bits when removing steel or stainless steel rivets, and titanium-coated or HSS bits for soft aluminum pop rivets. Match the bit diameter to the manufacturer’s blind sleeve guide or solid-rivet head-depth rule rather than to a universal chart.
Compare these 2 ways to size the drill bit from primary technical sources before chucking a tool:
- Blind Rivet Manufacturer Example (GESIPA USA): In its blind rivet removal procedure, GESIPA USA removes a 4 x 10 mm (4.0 mm by 10 mm) PolyGrip blind rivet with a 4.1 mm drill bit. That 4.1 mm bit matches the nominal installation hole diameter after knocking the mandrel pin out. For standard 1/8-inch (3.2 mm) aluminum pop rivets, The Honest Carpenter similarly uses a 1/8-inch bit (3.2 mm) to sever the flange ring.
- Solid Rivet Repair Method (EAA and Builder Practice): In the EAA sheet-metal repair article, aircraft rivet diameters of 3/32-inch (2.4 mm), 1/8-inch (3.2 mm), 5/32-inch (4.0 mm), and 3/16-inch (4.8 mm) pair with #40 (2.5 mm), #30 (3.3 mm), #21 (4.0 mm), and #11 (4.9 mm) installation hole drills. For removal, EAA instructs selecting a drill bit slightly smaller than the original hole drill and drilling no farther than the rivet head. Builders on Van’s Air Force start a 1/8-inch (3.2 mm) rivet in a #30 (3.3 mm) hole with a #40 (2.5 mm) or 3/32-inch (2.4 mm) pilot bit. They drill only to the depth of the manufactured head and pry the cap off with a pin punch.
Numbered wire-gauge drills (#40 or #30) and fractional inch bits (3/32-inch or 1/8-inch) shouldn’t be assumed identical without referencing a decimal chart. Supporting the backside becomes as critical as bit diameter when moving from aluminum pop rivets to solid steel or semi-tubular fasteners.
Remove Solid Steel Rivets and Semi-Tubular Rivets with Support
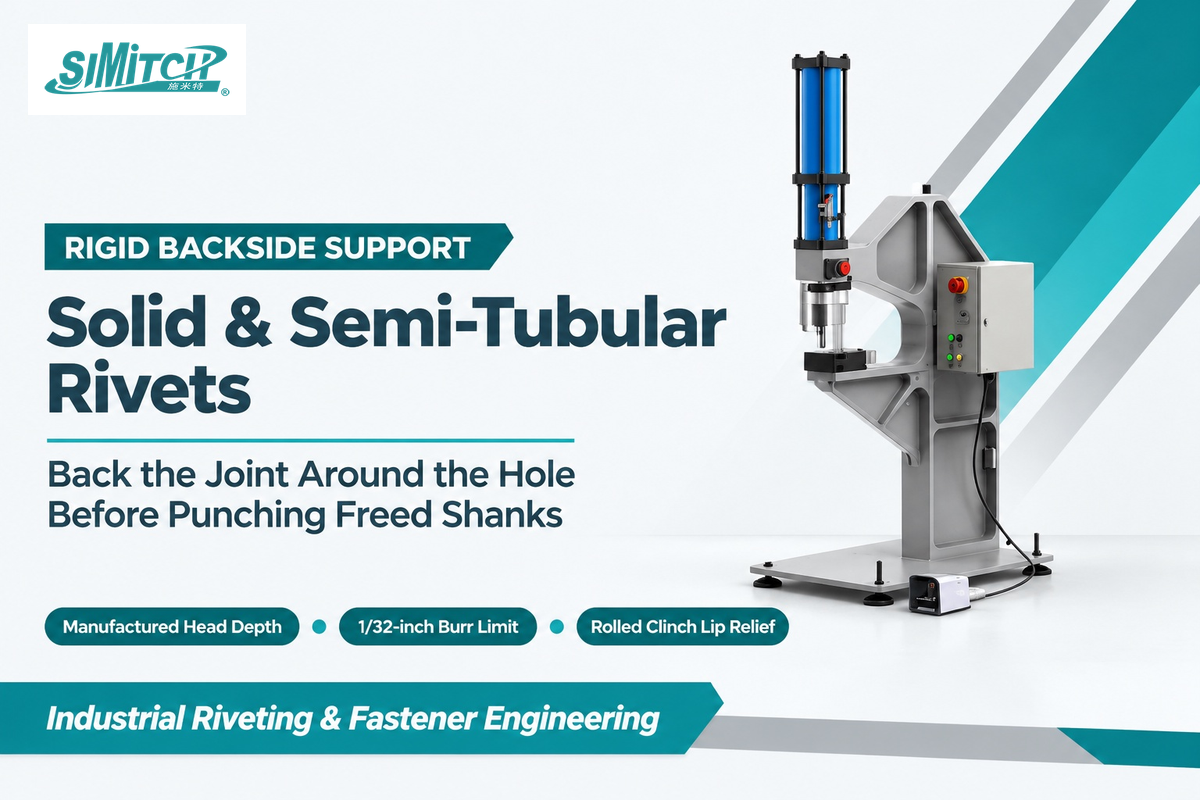
Solid steel rivets and semi-tubular rivets, on the other hand, require rigid backside support and a head or clinch-lip drilling relief rather than full-depth drilling. Unsupported thin sheet can bend under punching force, so support the sheet around the hole with a backing tool that leaves exit clearance.
For solid rivets, the EAA describes drilling only to the depth of the manufactured head before snapping it off. A semi-tubular rivet can be removed by drilling or grinding the manufactured head or the rolled clinch lip. For solid rivets on non-pressurized civil aircraft sheets without an OEM repair manual, FAA AC 43.13-1B Change 1 and the EAA sheet-metal repair guide outline a strict procedure. Technicians center-punch the manufactured head and drill it only to the head-to-shank junction. They then snap the head off sideways with a pin punch, back the skin around the hole, and tap the shank out. Drilling from the bucked shop tail is slower because the tail is flatter and work hardened.
Heavy-duty structural rivets follow a different code of civil engineering. According to Iowa DOT Special Provision SP-236023 (Series 2023 bridge specifications), crews may use an approved pneumatic rivet buster or hand grinder to remove structural rivet heads. Then they punch the shank, keeping any burr chamfer to 1/32-inch (0.8 mm) maximum. Keep FAA aircraft skin rules and DOT structural bridge rules strictly within their own engineering domains.
Like the tubular rivets, the semi-tubular and self-piercing rivets require their own workflows. As Hanson Rivet notes on tubular fasteners, a semi-tubular rivet has a shallow end cavity and requires less setting force than a solid rivet. You remove a semi-tubular rivet by grinding or drilling either the factory head or the thin rolled lip on the back of the rivet. Then push the solid shank out. Self-piercing rivets (SPR) in the automotive industry flare into the bottom sheet without a through-hole. Check our guide on self-piercing rivet defect diagnosis and follow the vehicle OEM’s manual rather than punching an SPR like a standard pin.
Remove Rivets Without a Drill: Chisel, Grinder or Pliers
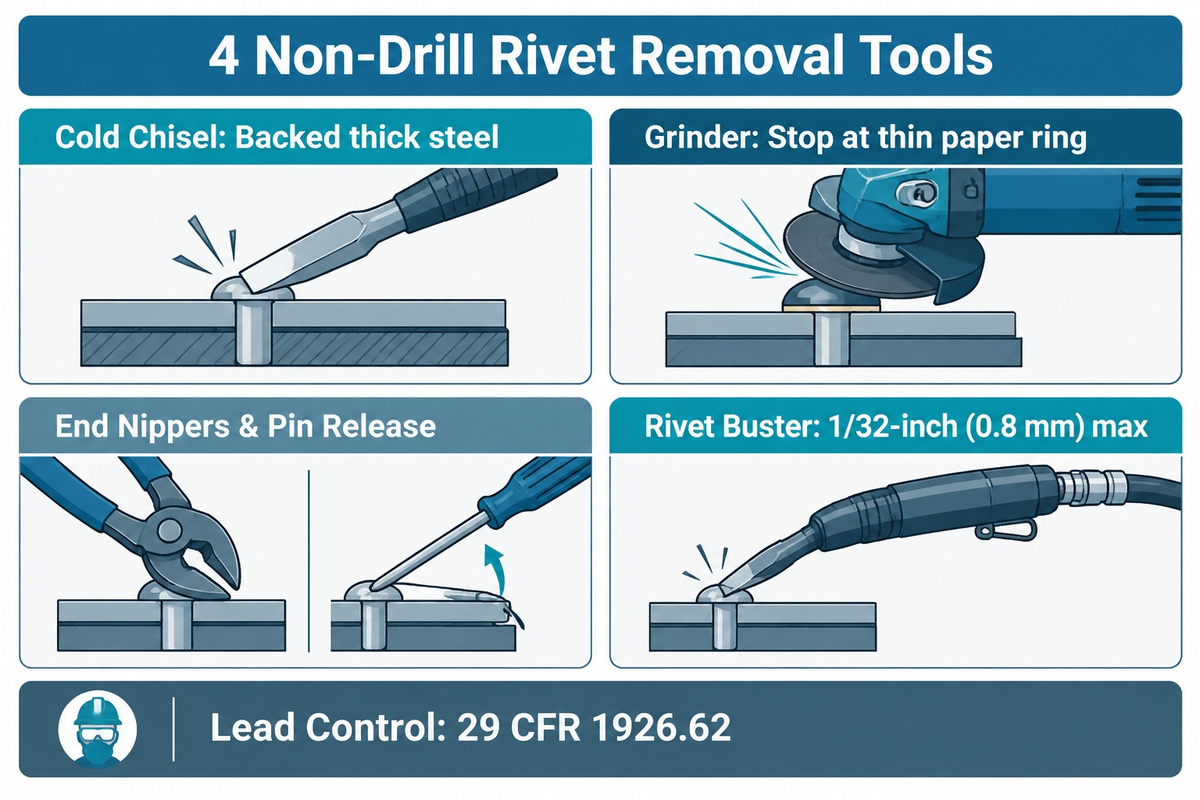
To remove a rivet without a drill, crews may use a cold chisel, angle grinder, a rotary die grinder, or release pliers. Hand chiseling and abrasive grinding trade the drill-centering risk for the potential for shock, sparks, and heat buildup. Never use an air hammer or heavy cold chisel on unsupported thin aluminum, fiberglass, or painted sheet metal.
When you cannot use a drill in a tight corner, compare these 4 non-drill methods before striking the joint:
- Cold Chisel and Hammer: Place a sharp flat cold chisel flush against the side of the rivet head on thick steel plate backed by a solid frame. Strike crisp blows to shear the head parallel to the surface. Avoid chiseling thin sheet metal panels, as the impact will stretch the rivet hole to a slot.
- Angle Grinder or Die Grinder: Use a flap disc on an angle grinder or a carbide burr in a die grinder to grind away the top of a steel rivet head. Stop when only a thin paper edge ring remains, then tap the shank through with a punch. Keep the abrasive wheel off the surrounding plate.
- For two-piece plastic push rivets, slide a flat screwdriver under the center pin head instead of pulling the outer grommet with locking pliers.
For a soft aluminum pop rivet with a raised lip, use end-cutting pliers to bite under the flange to remove the rivet.
- Pneumatic Rivet Buster (Heavy Structural Steel Only): For heavy, structural steel plates and bridge girders, use an air powered rivet buster.
Under Iowa DOT Special Provision SP-236023 for structural steel bridge work, crews remove rivet heads with an approved pneumatic rivet buster or hand grinder. The surrounding steel must not be gouged and burr chamfers must stay within 1/32 of an inch (0.8 mm).
Consider occupational health rules when switching from a slow drill to impact or abrasive tools. On legacy painted structural steel bridges or tanks coated with lead-based paint, pneumatic rivet busting and power grinding disturb toxic coatings. Those operations trigger airborne lead controls under US construction standard 29 CFR 1926.62(d)(2)(iii)(B). Even on clean shop metal, as ACS Composite warns for automotive panels, grinding sparks and friction heat can scorch clearcoats and melt adjacent plastic trim.
Stop a Pop Rivet Spinning or Clear a Stuck Shank
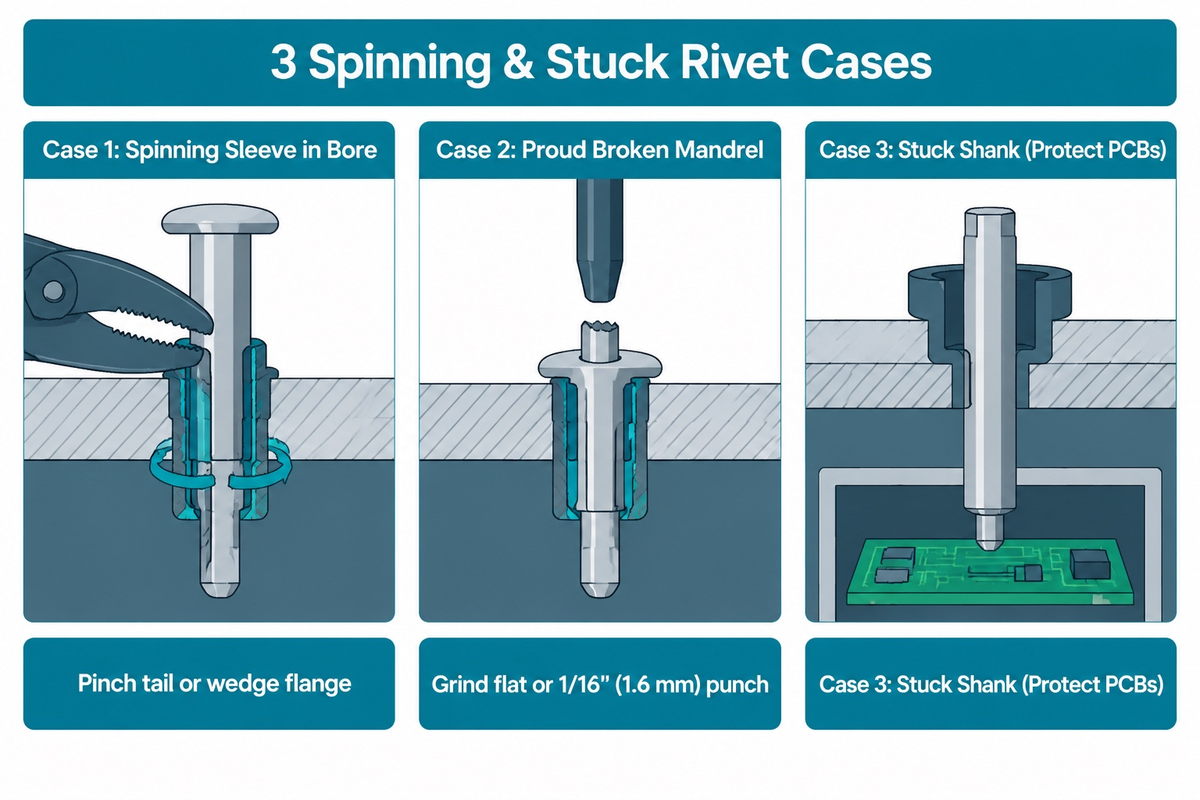
Stop feed pressure and restrain a spinning sleeve prior to drilling again; for a headless shank stuck in the hole, support the adjacent sheet and use a pin punch to push it out. Deal with the situation as 3 different cases: a spinning sleeve, an off-center proud mandrel, or a headless shank stuck in the bore.
Machinists on Practical Machinist note that stainless steel blind rivets in thin sheet metal often lose clamping preload. They spin as soon as the drill flutes bite. When the sleeve spins in the hole, lack of relative motion between the drill bit and the sleeve can hinder cutting, while continued rotation can wear the surrounding hole.
How to remove rivets that are spinning?
To remove rivets that are spinning in a thin sheet of metal without marking the surface, apply masking tape around the head and stop drilling immediately. Lock the sleeve with needle nose locking pliers on the back side tail when the rear is open, or use a thin, flat blade to wedge under the front flange when the rear is closed. Once the sleeve sits steady, drill to the head shoulder at low speed using light pulsing pressure and a depth-stop collar on a sharp split-point cobalt bit. Match that bit to the nominal hole diameter, for example, a 4.1 mm bit would be used for a 4.0 mm blind rivet or a 1/8-inch (3.2 mm) bit for a 1/8-inch pop rivet. Then use a backing socket ring to support the hole and push the shank out with a flat pin punch of the same size.
Fabrication builders on Chief Delphi have shared 2 practical shop fixes for removing steel rivets that spin inside box tubing. The first fix is to have a buddy reach in with needle nose pliers to pinch the blind tail, and the second fix is to hold the rivet still to stop it from spinning and then grind off the cap. If your bit skates off a broken mandrel that’s sticking up above the head, grind that down flat first, or you can knock it down with a 1/16″ (1.6 mm) pin punch.
What if the head pops off cleanly, but the cylindrical shank is stuck? There could be a broken mandrel ball stuck in the tail. Support the back of the rivet joint with a socket ring, and then tap the shank straight through with a flat pin. Never do this if there’s a chance the shank could be driven into an electronics box, as the broken mandrel could be shorting out PCBs. If there’s a chance mandrel debris could short circuit something, don’t punch into live circuitry. Arrange rear capture or open an access panel first.
Inspect the Rivet Hole Before Replacing the Fastener
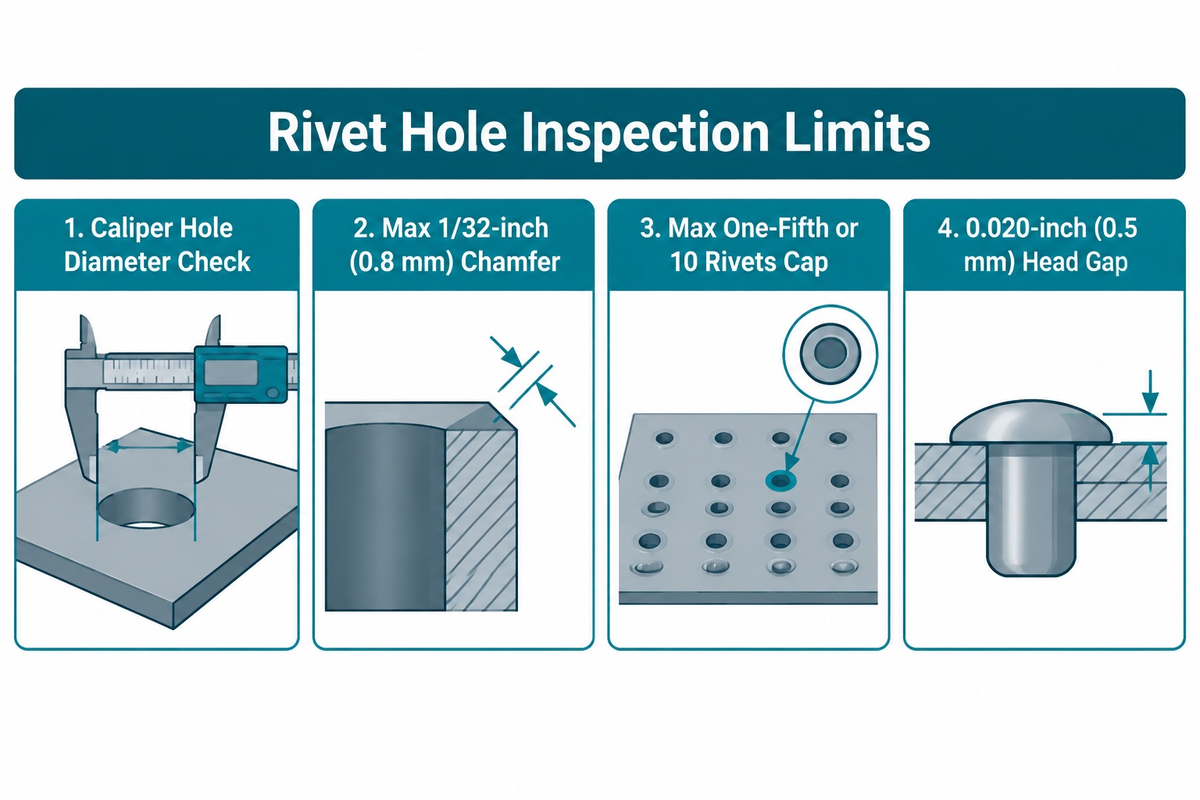
Before installing a new fastener, the rivet hole must be inspected to make sure the bore has no elongation, burrs, or edge cracks. Assume nothing about a cleared hole being ready for a new rivet of the same size. Remove all swarf and very lightly deburr the edges of the hole. Be sure to check the bore for roundness and tolerance against the joint drawing.
Deburring and hole repair are two separate procedures. According to the EAA repair guide, in sheet-metal work on aircraft, light surface burrs are deburred just enough to break the sharp edge with a deburring tool. Avoid countersinking the sheet while deburring. An enlarged hole is stepped up to the next standard rivet diameter only if edge-distance and pitch rules permit. In structural steel bridge work under Iowa DOT SP-236023, chamfering burrs is restricted to 1/32-inch (0.8 mm). Under Iowa DOT SP-236023, reaming deformed existing holes to the next larger rivet diameter is strictly limited. Reamed holes can’t exceed one-fifth of the rivets or 10 rivets in a single pattern, whichever is less, without engineering approval.
When a thin-sheet hole in a non-structural enclosure is slightly out of round, replacing the fastener also requires checking the load path. See our description of sheet metal fastener options before substituting a rivet, threaded hardware, or clinching.
| Row | Post-Removal Hole Observation | Inspection Step and Reference Basis | Replacement Fastener Routing |
|---|---|---|---|
| 1 | Round bore with clean walls and zero visible scoring | Check hole diameter with pin gauge or caliper against assembly drawing | Install original nominal diameter rivet once hole tolerance is confirmed |
| 2 | Light exit burr or drill swarf clinging to hole rim | Deburr lightly; on bridge steel per Iowa DOT SP-236023, limit chamfer to 1/32-inch (0.8 mm) | Re-inspect bore diameter after deburring; fit original size fastener if wall is intact |
| 3 | Slightly ovalized hole in non-structural thin sheet enclosure | Measure maximum bore width and remaining sheet edge distance | A slightly oval hole can be reamed for a larger rivet when edge distance and joint strength permit. A multi-grip blind rivet still requires a hole within its specified diameter tolerance |
| 4 | Enlarged hole in nonpressurized aircraft skin (no OEM manual) | Check EAA / FAA AC 43.13-1B repair rules for pitch and edge-distance minimums | A larger AN470 rivet is an option when the repair permits a universal head. The replacement must meet material, sheet-thickness, spacing, edge-distance, and strength requirements |
| 5 | Structural bridge steel hole misaligned after rivet busting | Check both the percentage and rivet-count limits stated above before reaming deformed rivet holes | Fit approved replacement hardware only within both limits. Obtain engineering approval before exceeding either limit |
| 6 | Dimpled or machine-countersunk flush hole with nicked cone seat | Inspect countersink angle and remaining web thickness under flush head seat | An oversized flush rivet works when the damaged seat can be restored to the head geometry with sufficient sheet thickness. Otherwise, repair the seat or replace the panel |
| 7 | Radial edge crack, tear-out, delamination, or sheet buckling | Quarantine part and map crack length from bore edge to panel boundary | Do not re-rivet; route to structural repair patch, doubler plate, or part replacement |
| 8 | Mandrel stem or drilled tail dropped inside sealed assembly | Extract loose conductive debris via inspection port, magnet, or vacuum | Hold reassembly until foreign object debris (FOD) clearance is verified |
| 9 | Replaced solid aircraft rivet head sitting slightly proud of skin | Check perimeter gap under manufactured head with a 0.020-inch (0.5 mm) feeler gauge per EAA repair guide | Accept sit if the 0.020-inch (0.5 mm) gauge does not pass to the shank. Drill out and re-set if gap exceeds limit |
After confirming the hole condition, additional reworks may require the use of dedicated shop tooling to achieve cleaner bores. The need for dedicated rework tooling can confuse buyers comparing rivet installation machines with rivet removal tools.
Buy Removal Tools, Not a Rivet Setting Tool
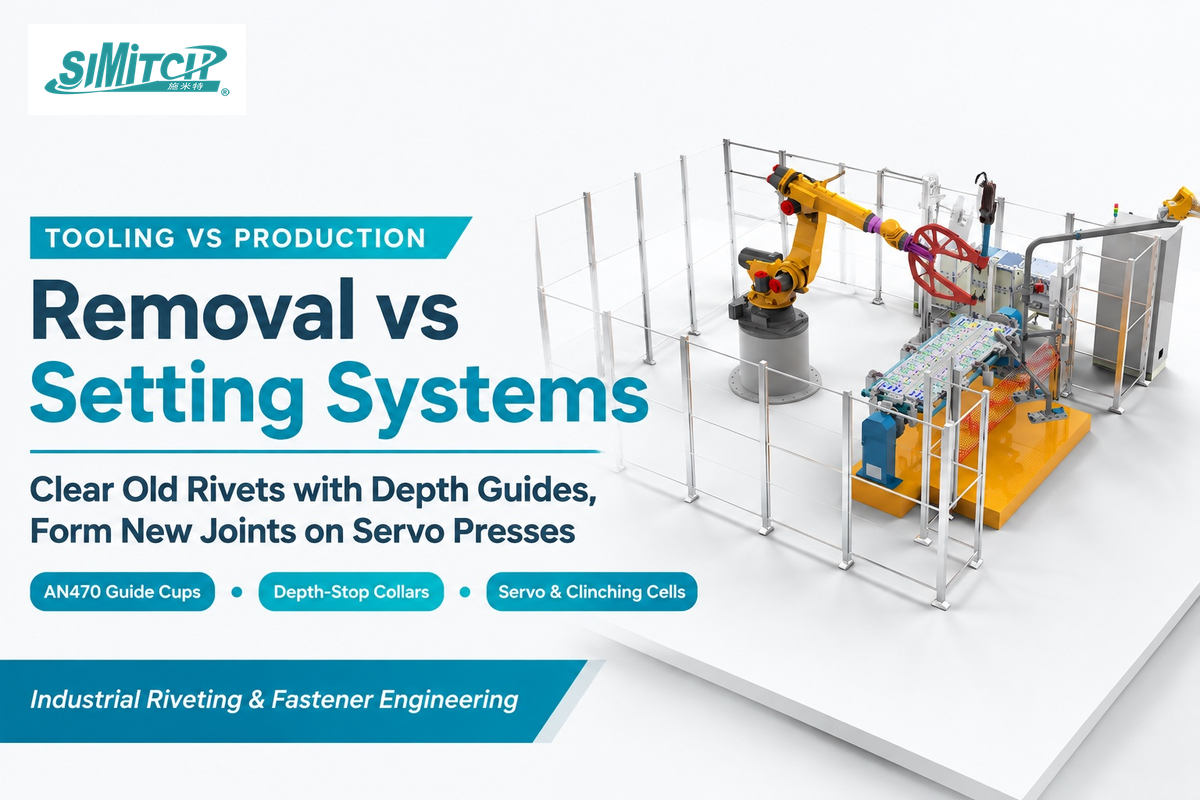
Rivet setting tools are dedicated machines that install new fasteners and can’t remove old fasteners. Buy a drill-mounted rivet removal tool when your shop removes standard universal-head solid rivets or blind rivets and needs preset depth control. For occasional rework, flush heads, or odd flange shapes, use a cobalt drill bit, a depth-stop collar, and a pin punch.
Can a rivet tool remove rivets?
A standard rivet tool can’t remove rivets. Hand pop-rivet pliers, pneumatic blind-rivet setting guns, and industrial orbital or radial riveting machines only pull mandrels or form heads during installation. Metal rivets are removed by drilling or cutting off the head and then driving out the remaining shank. Releasable plastic rivets can be removed by pushing out, pulling, or unscrewing their center pins, depending on the fastener design.
Even specialized rivet removal guides fit specific head shapes rather than every fastener on the market. In its product brief on the ATS Rivet Removal Tool, Kitplanes notes that the attachment uses threaded drill bits and guides. Those guides fit 3/32-inch (2.4 mm), 1/8-inch (3.2 mm), 5/32-inch (4.0 mm), and 3/16-inch (4.8 mm) universal-head AN470 solid rivets. Buy a cupped guide attachment only when your fastener head profile and diameter match the tool’s nosepieces; a round AN470 cup won’t seat flat on a flush countersunk rivet or wide-flange pop rivet.
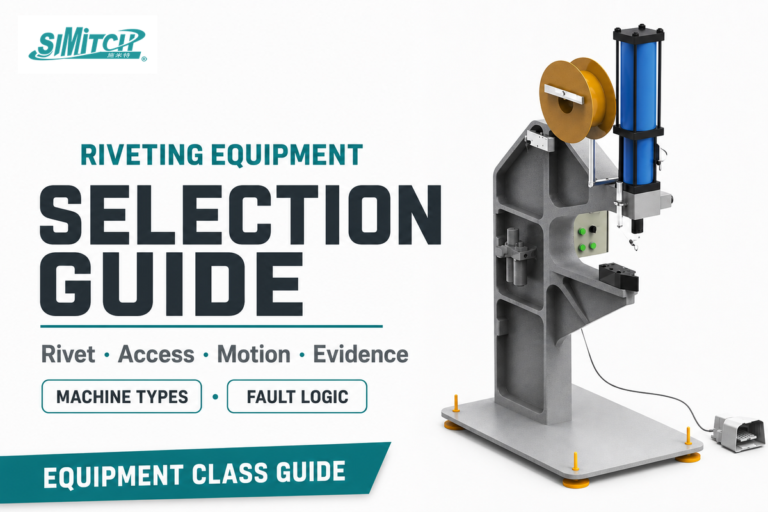
As Assembly Magazine notes on blind riveting, fastener installation is fast and permanent, thus rework requires extra care to avoid marring the assembly. When your team is done clearing damaged fasteners and needs production equipment for setting new joints, consult our guide on matching riveting equipment to the joint. SIMITCH manufactures industrial self-piercing riveting, automatic servo riveting, hydro-pneumatic, servo press, and clinching machines for controlled joint formation. If your engineering team is planning a production riveting station with defined joint drawings and material thicknesses, you can discuss an industrial riveting application with our technical team.
What’s Changing in Rivet Rework and Repair?
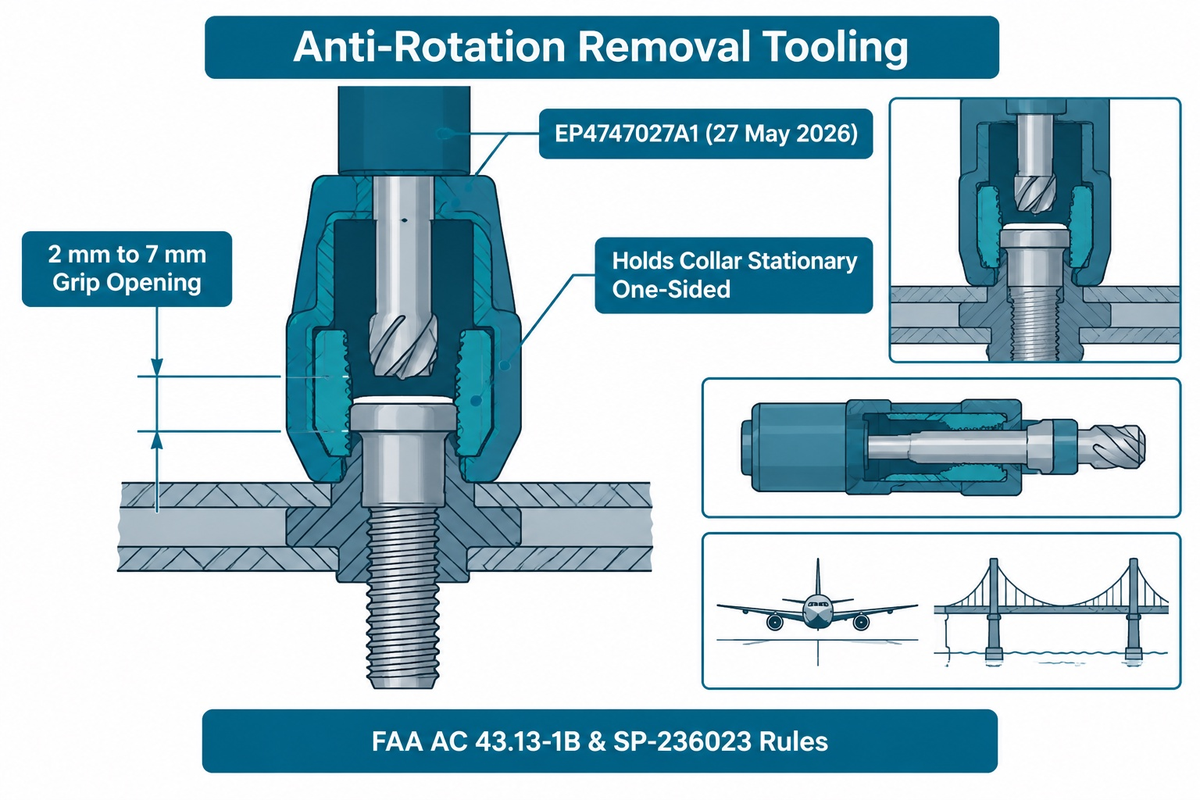
Recent tooling disclosures, such as European Patent Application EP4747027A1, show rework tooling has added drill guide sleeves and depth stops. This patent shows a 2 mm to 7 mm opening of the sleeve, while keeping the two-step metal head and shank removal. Match your rework tooling to joint clearance, fastener alloy and the tolerance of the hole.
Precision manufacturing is highly specialized engineering. For example, in certain aerospace manufacturing, engineering work centers on stopping blind fasteners from spinning while the cutter engages the head. European Patent Application EP4747027A1, filed by Airbus Atlantic SAS and published on 27 May 2026, discusses a tool for removing a blind fastener, where an anti-rotation sleeve is used to grip the female head across a 2 mm to 7 mm opening. This sleeve holds the fastener collar stationary while cutting, and doesn’t require a second operator to be located on the opposite side of the head.
From a regulatory standpoint, foundational maintenance references remain stable. Civil aviation technicians still refer to FAA Advisory Circular AC 43.13-1B Change 1 for non-pressurized areas, lacking OEM repair instructions. State provisions, like Iowa DOT SP-236023, outline requirements for structural bridge crews. Skip generic multi-tool kits and equip your bench with cobalt bits, depth-stop bushings matched to your fastener head diameter, and flat pin punches.
FAQ
Are rivets removable?
Yes, rivets are removable, but standard metal blind and solid rivets must be destroyed by cutting or drilling off the head and punching out the shank.
The MIT D-Lab Fasteners guide states that blind pop rivets create a semi-permanent joint and can’t be backed out in one piece like a threaded machine screw. The exceptions to this rule are specialized removable plastic rivets made of acetal, nylon 6, or nylon 6/6 documented by Essentra Components for push-in and screw designs. These plastic pins separate from the grommet without deformation when the user pulls, pushes out, or unscrews the center pin according to the fastener design.
Can you reuse removed rivets later?
You cannot reuse metal blind pop rivets, solid rivets, or semi-tubular rivets once they have been drilled or cut out of a joint.
Removing a metal rivet permanently alters the fastener sleeve and severs the head from the tail shank. Essentra Components describes its knobhead push-in rivets as being reusable up to 25 times and states that its screw rivets release by unscrewing the crosshead pin. Inspect the nylon grommet legs first to see if they’re damaged (bent, cracked or deformed).
What can you replace rivets with?
You should replace a removed rivet with the exact fastener specified on the assembly drawing or repair manual after verifying the hole diameter and roundness.
If the original hole is clean and within tolerance, you may install a rivet of the same material family, or use a next-size rivet on a slightly oval hole in non-structural sheet metal. A blind rivet still requires a hole within its stated tolerance. Don’t substitute hardware in a load-bearing structural joint on a vehicle, aircraft or bridge without consulting a licensed engineer.
Can you remove rivets from jeans?
Yes, you can remove metal burr rivets from denim jeans by prying or clipping the backside post cap with small end nippers while shielding the fabric.
Use a flat screwdriver or butter knife to push between the brass washer and denim to protect the fibers, then trim the center copper post instead of twisting the cap.
How do you remove rivets from leather?
Remove double-cap or tubular rivets from leather by slipping a thin guard blade under the rear cap and cutting or drilling the soft post with light pressure.
Leather scorches easily with friction heat. They also stretch if hit with too much force with a hammer or chisel. Slide a thin, flat steel or feeler gauge between the rear flange and the part to protect the grain. Then nip the hollow brass or copper post with flush end cutters, or drill the center post slowly at low speed until the cap lifts free.
Can you remove rivets with pliers?
Pliers alone cannot pull an intact metal rivet straight through a hole without tearing the surrounding sheet metal.
Use locking pliers or needle nose pliers to keep a loose pop rivet from spinning while you drill the head. Heavy end cutting nippers can be used to shear soft aluminum flanges.
How do you remove rivets from plastic?
First check whether the fastener is a two-piece plastic push rivet or a metal blind rivet clamping a plastic panel.
For plastic push-in or screw rivets, unscrew the center crosshead pin, or if it’s a pull design, release the center pin and lift the outer grommet. If a metal pop rivet holds a plastic bumper or fender bracket, support the fragile plastic tightly from behind. Drill the metal flange slowly in short bursts so friction heat does not melt and enlarge the polymer bore.
References & Sources
- Federal Aviation Administration (FAA) Advisory Circular AC 43.13-1B with Change 1: Acceptable Methods, Techniques, and Practices, Aircraft Inspection and Repair
- Iowa Department of Transportation (Iowa DOT)
- Experimental Aircraft Association (EAA)
Repairing Sheet Metal: Rivet Diameters, Hole Drill Sizes, and Head Removal
- MIT D-Lab
MIT D-Lab Fasteners Engineering Guide: Semi-Permanent Rivet Joints and Blind Pop Rivets
- GESIPA USA Removing Blind Rivets Made Easy: Mandrel Pin and 4.1 mm Drill Bit Procedure
- Essentra Components All You Need to Know About Removable Nylon and Polycarbonate Rivets
- Hanson Rivet & Supply Co. Tubular and Semi-Tubular Rivet Tools and Machines
- Kitplanes Magazine Stop Damaging Rivets: ATS Rivet Removal Tool for AN470 Solid Rivets
- Assembly Magazine: All About Blind Riveting: Joint Permanence and Rework Care
- European Patent Office / Google Patents EP4747027A1 (Airbus Atlantic SAS, 2026): Removal Tool with 2 mm to 7 mm Anti-Rotation Member for Blind Fasteners
- Van’s Air Force Builder Community Tip: Drilling Out Solid Aircraft Rivets to Manufactured Head Depth
- ACS Composite The Best Way to Remove Rivets for Automotive Applications
- The Honest Carpenter – I Need to Remove Pop Rivets: How Do I Do That?
- Practical Machinist Forum – Fabrication: Rivet Nuts, Blind Rivets, and Spinning Stainless Steel Rivets in Sheet Metal
- Chief Delphi Robotics Community – Removing Steel Rivets: Stopping Spinning Sleeves in Box Tubing


WHY WE WRITE THIS
About SIMITCH
SIMITCH develops sheet-metal joining equipment for clinching, riveting, servo pressing, pneumohydraulic drive and hot-melt connection applications. Our engineering team starts with the material stack, access envelope, cycle target and acceptance method before recommending a machine route.
Founded in 2006 in Taicang, Jiangsu, SIMITCH combines research and development, in-house production and global sales. These guides turn field experience into practical decision support for process engineers, plant teams and industrial buyers.
OUR EXPERIENCE
Since 2006
Equipment engineering, machining, assembly and joint validation under one manufacturing system.
OUR EXPERTISE
Five joining routes
Clinching, riveting, SPR, precision press-fit and hot-melt connection for production lines.